
PGY2801C - Electronic Still Photography Allen Cheuvront
2011 Fall B
allen@cheuvront.com
Project 2 – The Aperture
In
photography, the quantity of light must be of sufficient amount to
activate the film or sensor's photosites, without "overflowing" them.
The shutter mechanism in the camera controls how long the sensor is
exposed to the light flowing through the lens, with values (often but
not always) expressed in fractions of a second. 1/2 second passes twice
the light as 1/4 second.
The "Aperture" or "Lens
Opening" is a series if matal blades, arranged to form a variable diaphram for varying the portion of the glass
lens through which the light is flowing. These openings are described
as a ratio between the lenses' "focal length"
(think wide-angle or telephoto for now) and the diameter of the
specific opening you have set, all measured in millimeters (mm). From Wikipedia:
The f-number is given by
 is the focal length, and
  is the diameter of the entrance pupil (effective aperture).
This produces the "f-stop" and permits very different lenses- telephotos, normal, and wide angle, for example, to pass the same amount of light even when the focal length part of the formula changes. So an f/ stop of 8 on a 20mm wide angle lens provides the same amount of light to the sensor as a f/8 on a 300 mm telephoto.
Each adjacent f stop provides either half or twice the light to be projected through the lens. This
half or twice relationship between the "full"* aperture sequence (see
below) is called "reciprocity" and allows a range of combinations of
shutter speeds and the lens openings to control the light in what
photographers call "stops."
Thus,
aperture forms one of the three primary camera controls of exposure. It
creates the graphic effect of "selective focus." Small apertures (large
f/ number) produces great depth of field and large apertures results in
narrow depth of field. The others are Shutter Speed (from the last
assignment), and ISO, a number relating to image sensor sensitivity. ISO, as are whole shutter speeds and full f/stops,
is spoken of in terms of "stops"
-with ISO 100 half as sensitive to light as
ISO 200. Thus one might say ISO 200 is a full stop faster than ISO 100.
You will also find ISO settings in 1/3 stop incriments. ISO
125 is 1/3 stop more sensitive as ISO 100.
| *I use the word full to differentiate between fractional stops, which were on film cameras expressed like "f/2.8 and one-half" or "f/8 point 4" (.4) Apertures could be set anywheere between full stops, while shutter speeds had to be specified in full increments. Now usually either can be adjusted in 1/ 2 or even 1/3 "stop" incriments. |
|
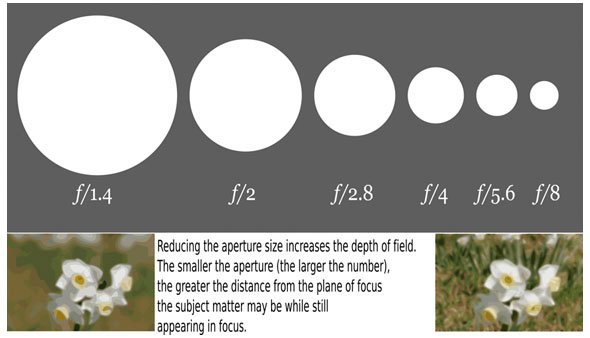 |
This
diagram illustrates the relationship between f stops (f/stop). These
numbers are the standard range and should be committed to memory. Each
adjacent sized "opening" allows either half or twice the amount of
light as it's next door neighbor. f/1.4 flows twice the light as f/2 (when the shutter stays constant) f/5.6 allows half as much light as f/4, but twice as much as f/8. Not unconcidentaly, each full shutter setting in effect delivers either half or twice as much light. 1/125th of a second increases the light at the sensor by twice 1/250 sec. and half as much as 1/60 sec. (approximately). The standard shutter speed range in seconds, which evolved from film cameras, is: 1, 1/2, 1/4, 1/8, 1/15, 1/30, 1/60, 1/125, 1/250, 1/500, 1/1000, 1/2000, 1/4000 modern shutters allow 2 sec, 4 sec, and 8 seconds and beyond. Each delivers either one half or twice the light. It is the same as with f/stops. A shutter speed of 1/4 sec delivers "1 stop" more light than 1/8 sec. Digital camera's shutters, unlike most older film cameras', have electronically controlled shutters, with settings expressed in decimals, and calibrated in 1/2 or 1/3 stop incriments. |
| The
phonomenon of "Depth of Field" comes from the interaction of a lens'
focal length, the chosen aperture (as a factor of the exposure), and
the distance between the lens and the focused subject. It is manifest
as a range of apparent
sharpness which exists within the photograph, between the actual point
of focus and objects behind and in front of that main subject. Large
openings like f/1.4 give very soft backgrounds, especially when the
main subject is close-up and the background is far behind it. This soft
focus background effect is even stronger with the use of telephoto than
with wide angle lenses at the same f/stops. |
|
 |
 Fame Vine "Narrow" or "Shallow" depth of field. Exposure : ISO 100 f/4.5 @ 1/45 sec; camera on tripod |
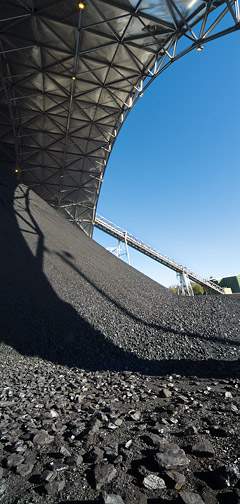
| Coal-Fired "Great" or "Deep" Depth of Field Exposure: ISO 100 1/10 sec. @ f/22 |
5 images / 100 points:
I want to see FIVE imaginative,
memorable, engaging, or in some other manner, outstanding, full
resolution digital photographic images. They shall be saved in camera
RAW with their associated sidecar (PIE) files, and a .psd native
Photoshop document, cropped and fine-tuned, with layers saved; You
should strive to make sure that all Photoshop work be performed in a "non-destructive" process.
Save
to a cd or dvd with your name and project name in the file structure,
and the same information on the label side of the disc with a Sharpie
marker.
a) 2 showing examples of great depth of field
b) 2 showing examples of shallow depth of field
c) 1
"equivalent exposures" of the same scene- 2 frames- and same overall exposure, but kept constant with different combinations of f stop and shutter speed
Objectives:
1)To Illustrate your ability to use the lens aperture to control exposure
2) You will create 5 well-exposed images, but also use the aperture to render space with these "depth of field" effects:
a) Photograph two (2) different scenes that have both the foreground and
background in apparent focus- great depth of field.
b) Make two (2) different photographs that
show the effect of a wide-open lens, where the plane of focus is
tightly demarcated and the rest of the image is not in apparent
focus- shallow depth of field
c) There are to be two (2) shots of the same subject, same framing and camera angle, but with 2
different camera exposure settings- both at a correct exposure. These are called "equivalent exposures."
Use settings like f16
at 1/30 of a second-OR- f8 at 1/125 sec-OR-
f4 at 1/500 s, depending on the light level and ISO. These are all
equivilant, but produce different graphic effects especially if there
is a great distance between the main subject and the background. The
effect of differential focus is also enhanced when using telephoto
lenses.
Think about how these settings
relate to each other.
The SimCam is an excellent reference for this project: http://www.photonhead.com/simcam/.
3) Seek out images that could be used for a post card. NO boring photographs! Use the correct camera settings to capture photos that illustrate the concepts and/or techniques stated for each photo. Exercise your creativity! Use your textbook as a reference if you are not clear on the process of producing the photo.
Requirements for completion of Project 2 – use the following guidelines (same as project 1):
•Shoot your images in CAMERA RAW (.NEF, CR2, etc)
• Use “Adobe Camera Raw” workflow to make adjustments, then “Open Image” and immediately save as a .psd
• Use adjustment layers to improve your image, and save with layers checked as .psd
• Save files to cd for delivery in class (remember to append the file number with the appropriate id letter -eg. a, b, c)
Use a Photographer’s Workflow: